1
 →
→
Framework for orchestrating role-playing, autonomous AI agents. By fostering collaborative intelligence, CrewAI empowers agents to work together seamlessly, tackling complex tasks.

Homepage · Open Source · Docs · Start Cloud Trial · Blog · Forum

CrewAI is an open-source Python framework with high-level abstractions and low-level APIs for building production-ready multi-agent workflows.
It gives developers autonomous agent collaboration through Crews and precise, event-driven control through Flows.
For organizations that need a commercial control plane around CrewAI, CrewAI AMP Suite adds managed deployment, observability, governance, security, and enterprise support.
You can try one part of the suite, the Crew Control Plane, for free.
Using an AI coding agent? Teach it CrewAI best practices in one command:
Claude Code:
/plugin marketplace add crewAIInc/skills
/plugin install crewai-skills@crewai-plugins
/reload-plugins
| Skill | When it runs |
|-------|--------------|
| getting-started | Scaffolding new projects, choosing between LLM.call() / Agent / Crew / Flow, wiring crew.jsonc / main.py |
| design-agent | Configuring agents — role, goal, backstory, tools, LLMs, memory, guardrails |
| design-task | Writing task descriptions, dependencies, structured output (output_pydantic, output_json), human review |
| ask-docs | Querying the live CrewAI docs MCP server for up-to-date API details |
Cursor, Codex, Windsurf, and others (skills.sh):
npx skills add crewaiinc/skills
This installs the official CrewAI Skills — structured instructions that teach coding agents how to scaffold Flows, configure Crews, design agents and tasks, and follow CrewAI patterns.
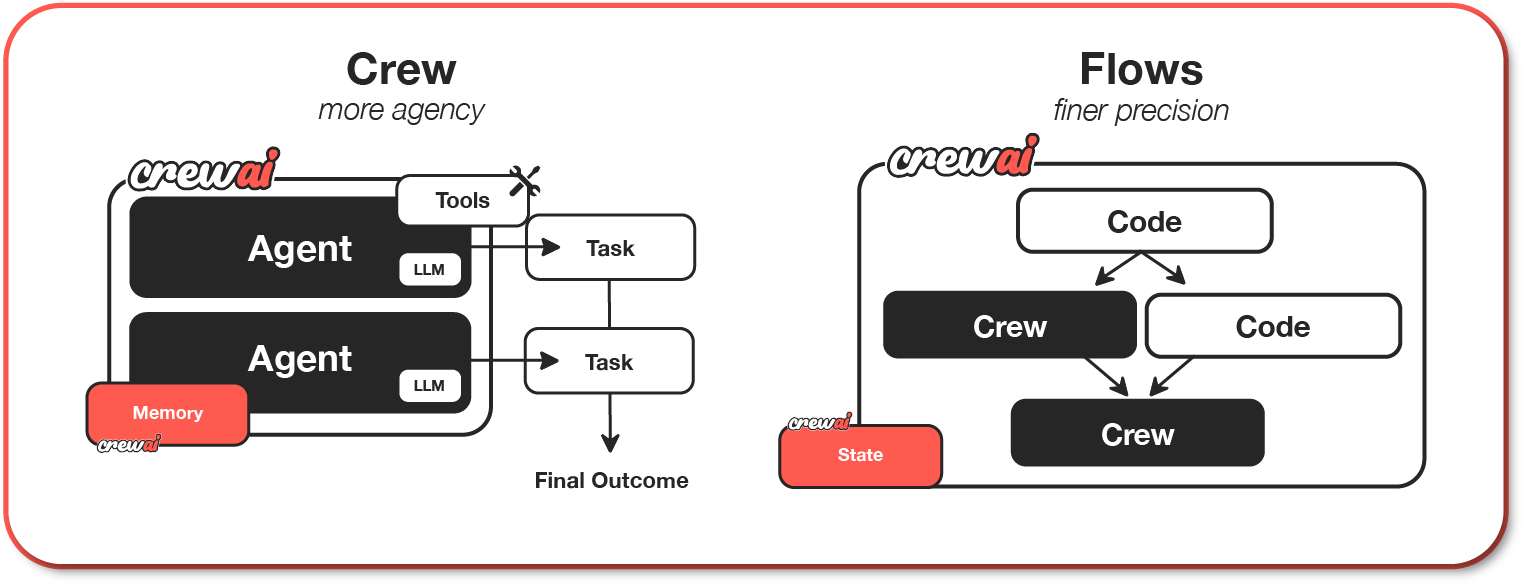
CrewAI unlocks the true potential of multi-agent automation, delivering speed, flexibility, and control through Crews of AI agents and event-driven Flows:
Setup and run your first CrewAI agents by following this tutorial.
[ ](https://www.youtube.com/watch?v=-kSOTtYzgEw "CrewAI Getting Started Tutorial")
Learn CrewAI through our comprehensive courses:
CrewAI offers two powerful, complementary approaches that work seamlessly together to build sophisticated AI applications:
1. Crews: Teams of AI agents with true autonomy and agency, working together to accomplish complex tasks through role-based collaboration. Crews enable:
To get started with CrewAI, follow these simple steps. The full walkthrough lives in the installation guide.
CrewAI requires Python >=3.10 and <3.14. Check your version with:
python3 --version
CrewAI uses UV for dependency management and package handling. If you haven't installed uv yet, install it first.
macOS/Linux:
curl -LsSf https://astral.sh/uv/install.sh | sh
If your system doesn't have curl, you can use wget:
wget -qO- https://astral.sh/uv/install.sh | sh
Windows:
powershell -ExecutionPolicy ByPass -c "irm https://astral.sh/uv/install.ps1 | iex"
If you run into any issues, refer to UV's installation guide.
Then install the CrewAI CLI:
uv tool install crewai
If you encounter a PATH warning, run:
uv tool update-shell
If you encounter the chroma-hnswlib==0.7.6 build error (fatal error C1083: Cannot open include file: 'float.h') on Windows, install Visual Studio Build Tools with Desktop development with C++.
Verify the install:
uv tool list
You should see something like:
crewai v0.102.0
- crewai
To upgrade the global CLI later:
uv tool install crewai --upgrade
This upgrades the global crewai CLI tool only. To upgrade the crewai version inside a project's virtual environment, see Upgrading CrewAI in a project.
crewai create crew creates a JSON-first crew project. Agents live in agents/*.jsonc, tasks and crew-level settings live in crew.jsonc, and crewai run loads that JSON definition directly.
crewai create crew <project_name>
This command creates a new project folder with the following structure:
my_project/
├── .gitignore
├── .env
├── agents/
│   └── researcher.jsonc
├── crew.jsonc
├── knowledge/
├── pyproject.toml
├── README.md
├── skills/
└── tools/
If you need the older Python/YAML scaffold with crew.py, config/agents.yaml, and config/tasks.yaml, run:
crewai create crew <project_name> --classic
See Using Annotations for the classic pattern.
agents/*.jsonc to define each agent's role, goal, backstory, LLM, tools, and behavior.crew.jsonc to define tasks, process, and input defaults.tools/ and reference them as "custom:".knowledge/ and skill files in skills/..env file.{placeholder} values in agent and task text, then set defaults in crew.jsonc under inputs. When you run crewai run, the CLI prompts for any missing values.
crewai create crew latest-ai-development
cd latest_ai_development
Then edit the generated files:
agents/researcher.jsonc
{
  "role": "{topic} Senior Data Researcher",
  "goal": "Uncover cutting-edge developments in {topic}",
  "backstory": "You're a seasoned researcher who finds relevant information and presents it clearly.",
  "llm": "openai/gpt-4o",
  "tools": ["SerperDevTool"],
  "settings": {
    "verbose": true
  }
}
agents/reporting_analyst.jsonc
{
  "role": "{topic} Reporting Analyst",
  "goal": "Create detailed reports based on {topic} data analysis and research findings",
  "backstory": "You're a meticulous analyst who turns complex data into clear, concise reports.",
  "llm": "openai/gpt-4o",
  "settings": {
    "verbose": true
  }
}
crew.jsonc
{
  "name": "Latest AI Development",
  "agents": ["researcher", "reporting_analyst"],
  "tasks": [
    {
      "name": "research_task",
      "description": "Conduct thorough research about {topic}. Find recent, relevant information.",
      "expected_output": "A list with 10 bullet points of the most relevant information about {topic}.",
      "agent": "researcher"
    },
    {
      "name": "reporting_task",
      "description": "Review the research and expand each topic into a full section for a report.",
      "expected_output": "A markdown report with the main topics, each with a full section of information. No fenced code blocks around the whole document.",
      "agent": "reporting_analyst",
      "context": ["research_task"],
      "output_file": "output/report.md",
      "markdown": true
    }
  ],
  "process": "sequential",
  "verbose": true,
  "inputs": {
    "topic": "AI Agents"
  }
}
Before running your crew, set the required keys in your .env file:
SERPER_API_KEY=YOUR_KEY_HEREcrewai install
crewai run
If you need additional packages, use uv add .
You should see the output in the console, and output/report.md should be created in the project root.
In addition to the sequential process, you can use the hierarchical process, which automatically assigns a manager to the defined crew to properly coordinate the planning and execution of tasks through delegation and validation of results. See more about the processes here.
For a Flow-first walkthrough, see the Quickstart.
CrewAI gives developers a practical foundation for building agentic systems that move from prototype to production: autonomous collaboration where it helps, explicit workflow control where it matters, and Python-native customization throughout.
You can test different real life examples of AI crews in the CrewAI-examples repo:
[ ](https://www.youtube.com/watch?v=tnejrr-0a94 "CrewAI Tutorial")
Check out code for this example or watch a video below:
[ ](https://www.youtube.com/watch?v=u98wEMz-9to "Jobs postings")
Check out code for this example or watch a video below:
[ ](https://www.youtube.com/watch?v=xis7rWp-hjs "Trip Planner")
Check out code for this example or watch a video below:
[ ](https://www.youtube.com/watch?v=e0Uj4yWdaAg "Stock Analysis")
CrewAI's power truly shines when combining Crews with Flows to create sophisticated automation pipelines.
CrewAI flows support logical operators like or_ and and_ to combine multiple conditions. This can be used with @start, @listen, or @router decorators to create complex triggering conditions.
or_: Triggers when any of the specified conditions are met.and_: Triggers when all of the specified conditions are met.from crewai.flow.flow import Flow, listen, start, router, or_
from crewai import Crew, Agent, Task, Process
from pydantic import BaseModel
Define structured state for precise control
class MarketState(BaseModel):
sentiment: str = "neutral"
confidence: float = 0.0
recommendations: list = []
class AdvancedAnalysisFlow(Flow[MarketState]):
@start()
def fetch_market_data(self):
# Demonstrate low-level control with structured state
self.state.sentiment = "analyzing"
return {"sector": "tech", "timeframe": "1W"} # These parameters match the task description template
@listen(fetch_market_data)
def analyze_with_crew(self, market_data):
# Show crew agency through specialized roles
analyst = Agent(
role="Senior Market Analyst",
goal="Conduct deep market analysis with expert insight",
backstory="You're a veteran analyst known for identifying subtle market patterns"
)
researcher = Agent(
role="Data Researcher",
goal="Gather and validate supporting market data",
backstory="You excel at finding and correlating multiple data sources"
)
analysis_task = Task(
description="Analyze {sector} sector data for the past {timeframe}",
expected_output="Detailed market analysis with confidence score",
agent=analyst
)
research_task = Task(
description="Find supporting data to validate the analysis",
expected_output="Corroborating evidence and potential contradictions",
agent=researcher
)
# Demonstrate crew autonomy
analysis_crew = Crew(
agents=[analyst, researcher],
tasks=[analysis_task, research_task],
process=Process.sequential,
verbose=True
)
return analysis_crew.kickoff(inputs=market_data) # Pass market_data as named inputs
@router(analyze_with_crew)
def determine_next_steps(self):
# Show flow control with conditional routing
if self.state.confidence > 0.8:
return "high_confidence"
elif self.state.confidence > 0.5:
return "medium_confidence"
return "low_confidence"
@listen("high_confidence")
def execute_strategy(self):
# Demonstrate complex decision making
strategy_crew = Crew(
agents=[
Agent(role="Strategy Expert",
goal="Develop optimal market strategy")
],
tasks=[
Task(description="Create detailed strategy based on analysis",
expected_output="Step-by-step action plan")
]
)
return strategy_crew.kickoff()
@listen(or_("medium_confidence", "low_confidence"))
def request_additional_analysis(self):
self.state.recommendations.append("Gather more data")
return "Additional analysis required"
This example demonstrates how to:
1. Use Python code for basic data operations 2. Create and execute Crews as steps in your workflow 3. Use Flow decorators to manage the sequence of operations 4. Implement conditional branching based on Crew results
CrewAI supports using various LLMs through a variety of connection options. By default your agents will use the OpenAI API when querying the model. However, there are several other ways to allow your agents to connect to models. For example, you can configure your agents to use a local model via the Ollama tool.
Please refer to the Connect CrewAI to LLMs page for details on configuring your agents' connections to models.
Use CrewAI when you need more than a single prompt or chatbot: multi-step work, specialized agents, tool use, structured outputs, human review, or workflows that combine autonomous reasoning with explicit business logic.
CrewAI is especially useful when you want to:
CrewAI is open-source and we welcome contributions. See
.github/CONTRIBUTING.md for the full setup guide,
branching conventions, and PR checklist.
Quick start:
git clone https://github.com/crewAIInc/crewAI.git
cd crewAI
uv sync --all-groups --all-extras
uv run pre-commit install
# Tests
uv run pytest lib/crewai/tests/ -x -q
Type checks
uv run mypy lib/
The site at docs.crewai.com is published from
docs/ by Mintlify. The docs use directory-based
versioning: edits to docs/edge//... (e.g.
docs/edge/en/concepts/agents.mdx) land under the Edge version selector
immediately and are frozen into a new versioned snapshot under
docs/v/ at the next release cut. Frozen snapshots are immutable — CI
rejects PRs that modify them without a [docs-freeze] title prefix. The
release CLI (devtools release) handles the freeze automaticall
→ →
→ →
→ →
→ →
→ →
→