1
 →
→
Community plugin to control Blender 3D with any LLM of your choice
ahujasid/mcp-for-blender is an open-source project on GitHub, mainly written in Python. Community plugin to control Blender 3D with any LLM of your choice It currently holds 29,751 stars and 2,706 forks with 36 open issues, and was last pushed on 2026-09-30 (repository created 2025-03-07).
Git Homed tracks it on the Today's Trending board.
Connect Blender to any LLM
formerly blender-mcp — the PyPI package is now mcp-for-blender.
Existing setups keep working; no config change is required. Read more
Disclaimer: This is a third-party integration and not made by Blender
Prompt-assisted 3D modeling, scene creation, and manipulation — driven by AI.


Website · Full Tutorial · Discord · Sponsor · Buy me a coffee · Feedback

Supporters
CodeRabbit Kevin Guanche Darias Guillermo Rauch
All supporters: Support this project
---
Note: the PyPI packageblender-mcpis nowmcp-for-blender. Existing setups
keep working — uvx blender-mcp still runs the server and no config change is
required. New installs should use mcp-for-blender.
What changed and why
One command sets up your AI apps and the Blender addon:
macOS / Linux
curl -LsSf https://www.mcp-for-blender.com/install.sh | sh
Windows (PowerShell)
powershell -ExecutionPolicy ByPass -c "irm https://www.mcp-for-blender.com/install.ps1 | iex"
Already have uv? Run uvx mcp-for-blender setup instead.
It installs uv if needed, finds the MCP clients on your machine (Claude Desktop, Claude Code, Codex, Cursor, VS Code, Devin Desktop/Windsurf, OpenCode, Antigravity), and lets you pick which to set up. Then it installs the Blender addon and enables it. Your existing config is kept: it only adds a blender entry and saves a .bak of each file it changes.
Then fully quit and reopen your AI app (on Windows, quit it from the system tray), open Blender, and ask it to build something. The addon starts its server when Blender opens.
Three steps: install uv, point your MCP client at the server, install the Blender addon.
1. Install uv
# macOS
brew install uv
Linux
curl -LsSf https://astral.sh/uv/install.sh | sh
Windows
powershell -c "irm https://astral.sh/uv/install.ps1 | iex"
Warning: Do not proceed before installing uv. Use the official installer — not pip install uv.
2. Add the MCP server to your client
{
    "mcpServers": {
        "blender": {
            "command": "uvx",
            "args": ["mcp-for-blender"]
        }
    }
}
claude mcp add blender uvx mcp-for-blender
codex mcp add blender -- uvx mcp-for-blender
See MCP Client Setup below for per-client instructions and one-click install buttons.
3. Install the Blender addon
uvx mcp-for-blender install-addon
Then in Blender: Edit → Preferences → Add-ons → enable Interface: MCP for Blender.
4. Connect
The addon starts its server when Blender opens. To check, press N in the 3D viewport → open the MCP for Blender tab (click Start MCP Server if it isn't running). That's it — ask Claude to build something.
Note: Only run one instance of the MCP server (either Cursor or Claude Desktop), not both.
---
| | | |---|---| | Two-way communication | Connect Claude AI to Blender through a socket-based server | | Object manipulation | Create, modify, and delete 3D objects in Blender | | Material control | Apply and modify materials and colors | | Scene inspection | Get detailed information about the current Blender scene | | Code execution | Run arbitrary Python code in Blender from Claude | | Asset & model generation | Poly Haven assets, Sketchfab models, Poly Pizza low-poly models, and AI-generated 3D models via Hyper3D Rodin and Hunyuan3D |
Generate AI 3D models (Hunyuan3D, Tripo, Hyper3D Rodin) straight into Blender without bringing your own API keys. More details
The system consists of two main components:
1. Blender Addon (addon.py) — a Blender addon that creates a socket server within Blender to receive and execute commands
2. MCP Server (src/blender_mcp/server.py) — a Python server that implements the Model Context Protocol and connects to the Blender addon
---
The quickest way is the one-line installer. It installs uv, configures your MCP clients, and installs and enables the Blender addon:
# macOS / Linux
curl -LsSf https://www.mcp-for-blender.com/install.sh | sh
# Windows (PowerShell)
powershell -ExecutionPolicy ByPass -c "irm https://www.mcp-for-blender.com/install.ps1 | iex"
Already have uv? Run uvx mcp-for-blender setup instead. See Quickstart for what it changes. The rest of this section covers manual setup.
macOS
brew install uv
Windows
powershell -c "irm https://astral.sh/uv/install.ps1 | iex"
Then add uv to the user path in Windows (you may need to restart Claude Desktop after):
$localBin = "$env:USERPROFILE\.local\bin"
$userPath = [Environment]::GetEnvironmentVariable("Path", "User")
[Environment]::SetEnvironmentVariable("Path", "$userPath;$localBin", "User")
Linux
curl -LsSf https://astral.sh/uv/install.sh | sh
It lands in ~/.local/bin — open a new shell so it's on your PATH.
Otherwise, installation instructions are on their website: Install uv
On every OS, use uv's official installer above — not pip install uv, which may not create the uvx command and can hide uv inside an environment your client can't see.
Warning: Do not proceed before installing uv.
MCP clients started from a GUI (Claude Desktop, Cursor, VS Code from the Dock/Start menu) do not inherit your terminal's PATH, so a bare "command": "uvx" can fail with spawn uvx ENOENT even though uvx works in your terminal. If that happens:
which uvx (macOS/Linux) or where uvx (Windows) — and use it as "command", e.g. /opt/homebrew/bin/uvx or C:\Users\\.local\bin\uvx.exe."command": "cmd", "args": ["/c", "uvx", "mcp-for-blender"].Avoid conda / pyenv / version conflicts.
uv chooses which Python runs the server. On machines with conda (auto-activated base), pyenv, or asdf — or with a newer CPython release that some dependencies do not have wheels for yet — uv can grab an interpreter that makes installation fail. Pin Python 3.11 and prefer uv-managed interpreters to avoid using whatever is on your PATH:
{
    "mcpServers": {
        "blender": {
            "command": "uvx",
            "args": ["--python", "3.11", "mcp-for-blender"],
            "env": { "UV_PYTHON_PREFERENCE": "only-managed" }
        }
    }
}
--python 3.11 still satisfies this package's requires-python >=3.10, and UV_PYTHON_PREFERENCE=only-managed keeps uv from selecting conda, pyenv, asdf, or system Python first. (The repo's .python-version is only a hint for contributors and does not affect uvx.)
If a previous failed attempt keeps replaying after a fix, clear the cache:
uv cache clean mcp-for-blender blender-mcp && uvx --refresh mcp-for-blender
On locked-down machines you can skip uvx entirely with pipx, then point your client at the installed command:
pipx install mcp-for-blender
pipx ensurepath          # then restart your shell / client
Use the resulting absolute path as "command" (find it with which mcp-for-blender / where mcp-for-blender) and omit args.
You can run the MCP server in a container instead of installing it. Blender itself still runs on your machine — the container only hosts the MCP server, which connects out to the Blender addon.
Build the image from the repo root:
docker build -t mcp-for-blender .
Then point your MCP client at it (the -i flag is required — the server talks to the client over stdin/stdout):
{
    "mcpServers": {
        "blender": {
            "command": "docker",
            "args": ["run", "-i", "--rm", "mcp-for-blender"]
        }
    }
}
The image defaults to BLENDER_HOST=host.docker.internal, which reaches the host's Blender out of the box with Docker Desktop on macOS and Windows.
On Linux, host.docker.internal doesn't exist and the addon only listens on localhost, so use host networking instead:
{
    "mcpServers": {
        "blender": {
            "command": "docker",
            "args": ["run", "-i", "--rm", "--network=host", "-e", "BLENDER_HOST=localhost", "mcp-for-blender"]
        }
    }
}
To enable safe mode in the container, add "-e", "BLENDER_MCP_SAFE_MODE=1" to args.
The following environment variables can be used to configure the Blender connection:
| Variable | Default | Description |
|---|---|---|
| BLENDER_HOST | localhost | Host address for Blender socket server |
| BLENDER_PORT | 9876 | Port number for Blender socket server |
| BLENDER_MCP_SAFE_MODE | off | Set to 1 to validate scripts before they run in Blender (see below) |
| BLENDER_MCP_APPS | auto | Set to 1 to force the inline viewport app on for clients that support MCP Apps without advertising it (the Codex plugin sets this) |
| BLENDER_MCP_OPENAI_FORMS | auto | Set to 1 to force the thumbnail asset pickers on (the Codex plugin sets this) |
Example:
export BLENDER_HOST='host.docker.internal'
export BLENDER_PORT=9876
You can also pass the connection as CLI flags, which take precedence over the environment variables. This is handy for running several Blender instances side by side, since each MCP client entry can point at a different port with plain arguments instead of env vars:
uvx mcp-for-blender --port 9877
In an MCP client config that means a second entry differing only in args:
{
  "mcpServers": {
    "blender": { "command": "uvx", "args": ["mcp-for-blender"] },
    "blender-b": { "command": "uvx", "args": ["mcp-for-blender", "--port", "9877"] }
  }
}
Each instance needs its own port set in the Blender addon panel to match.
Note: the addon's socket server has no authentication or encryption, so
anyone who can reach that port can run Python inside Blender. Keep it on
localhost unless you are on a trusted network, and prefer an SSH tunnel overpointing--host/BLENDER_HOSTat a remote machine directly.
By default, the AI can run any Python code in Blender. Set BLENDER_MCP_SAFE_MODE=1 to check every script before it runs and block risky code — things like reading or writing files directly, running other programs, accessing the network, or installing code that keeps running after the script ends. Normal Blender work (modeling, materials, rendering, saving, import/export) still works. Blocked scripts are sent back to the AI with the reason, so it can try again with a corrected version.
---
Watch the setup instruction video (assuming you have already installed uv)
Go to Claude → Settings → Developer → Edit Config → claude_desktop_config.json and include the following:
{
    "mcpServers": {
        "blender": {
            "command": "uvx",
            "args": [
                "mcp-for-blender"
            ]
        }
    }
}
Use the Claude Code CLI to add the MCP for Blender server:
claude mcp add blender uvx mcp-for-blender
The Codex CLI, desktop app, and IDE extension all share the same config file (~/.codex/config.toml), so setting the server up once covers all three.
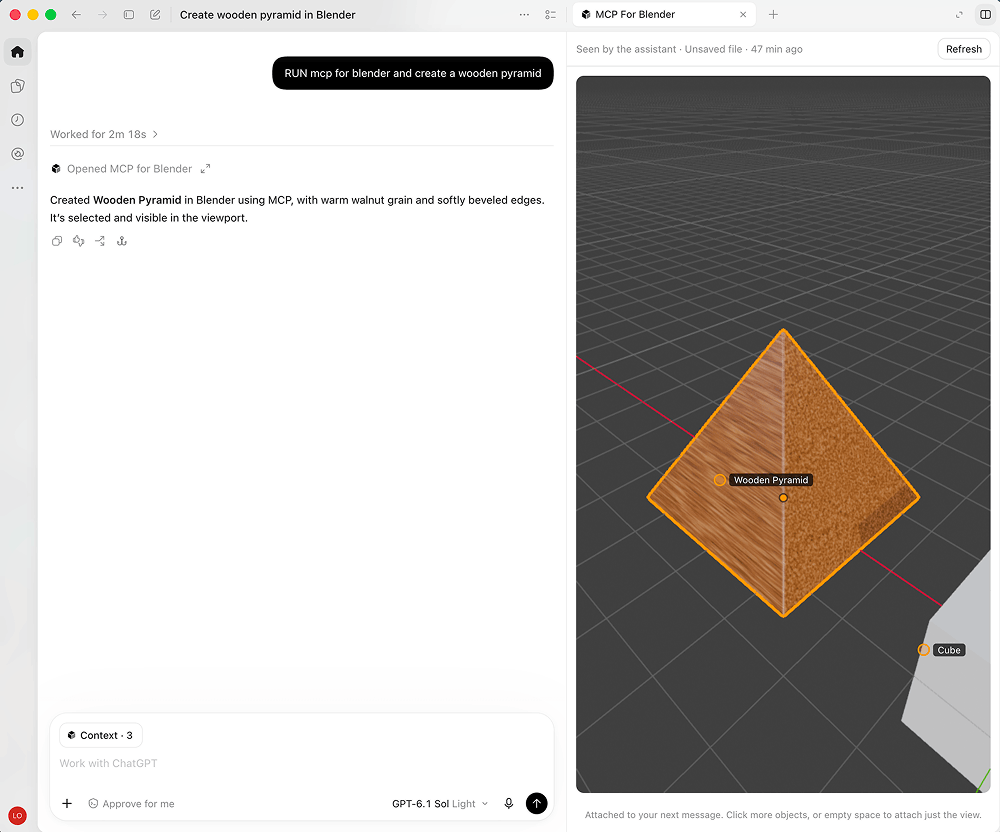
The plugin adds a live viewport inline in the chat (click an object to attach it to your next message), thumbnail pickers for Poly Haven, Sketchfab and Poly Pizza, and @-mentions for scene objects, materials and collections. It isn't in the Codex plugin directory yet, so add it from this repo:
git clone https://github.com/ahujasid/blender-mcp.git
codex plugin marketplace add ./blender-mcp/integrations/codex
Then restart Codex, install MCP for Blender from the plugins directory, and ask it to use MCP for Blender in chat. Once it's running, the viewport opens in a side panel next to the conversation:
Register the server with the Codex CLI:
codex mcp add blender -- uvx mcp-for-blender
Or add it by hand to ~/.codex/config.toml (or $CODEX_HOME/config.toml):
[mcp_servers.blender]
command = "uvx"
args = ["mcp-for-blender"]
Or in the Codex desktop app: Settings → MCP servers → Add server → name it blender, pick STDIO, enter uvx mcp-for-blender as the command, then Save and restart. If the app can't find uvx, use its full path instead — see Make your client find uvx.
Check it registered with codex mcp list — the blender server should show as enabled. The tools become available the next time you start Codex.
To set environment variables (e.g. a non-default Blender host/port), pass --env KEY=VALUE flags to codex mcp add, or add them in the config file:
[mcp_servers.blender]
command = "uvx"
args = ["mcp-for-blender"]
env = { BLENDER_HOST = "localhost", BLENDER_PORT = "9876" }

macOS — go to Settings → MCP and paste the following:
.cursor/mcp.json in the root of the project and paste{
"mcpServers": {
"blender": {
"command": "uvx",
"args": [
"mcp-for-blender"
]
}
}
}
Windows — go to Settings → MCP → Add Server, add a new server with the following settings:
{
    "mcpServers": {
        "blender": {
            "command": "cmd",
            "args": [
                "/c",
                "uvx",
                "mcp-for-blender"
            ]
        }
    }
}
Note: Only run one instance of the MCP server (either on Cursor or Claude Desktop), not both.
Prerequisites: Make sure you have Visual Studio Code installed before proceeding.

{
  "mcp": {
    "blender-mcp": {
      "type": "local",
      "command": ["uvx", "mcp-for-blender"],
      "enabled": true,
      "environment": {
        "BLENDER_HOST": "localhost",
        "BLENDER_PORT": "9876"
      }
    }
  }
}
{
  "mcpServers": {
    "blender-mcp": {
      "command": "uvx",
      "args": ["mcp-for-blender"],
      "env": {
        "BLENDER_HOST": "localhost",
        "BLENDER_PORT": "9876"
      }
    }
  }
}
---
uvx mcp-for-blender setup (see Quickstart) does all of this, including enabling the addon. The steps below are for doing it by hand.1. Recommended — from a terminal, run:
uvx mcp-for-blender install-addon
This copies the addon into your Blender addons folder as blender_mcp.py. It prints where it wrote to, and keeps a .bak of any file it replaces.
Optional:uvx mcp-for-blender addon-pathslists detected Blender addons folders. Override the destination withBLENDERMCP_ADDONS_DIR=/path/to/scripts/addons.
2. Open Blender
3. Go to Edit → Preferences → Add-ons
4. Enable Interface: MCP for Blender (search "MCP for Blender"). If it doesn't appear yet, click Install… and select the copied blender_mcp.py / addon.py, or restart Blender.
5. Manual alternative — if the command above can't find your Blender install, or you prefer doing it by hand: download addon.py from this repo → in Blender, Edit → Preferences → Add-ons → Install… → select the downloaded addon.py → enable it.
Then open the MCP for Blender tab in Blender's sidebar (press N in the 3D viewport) and click Start MCP Server. See Starting the Connection below.
For newcomers, go straight to Quickstart. For existing users, see below.
1. Update the addon file by running:
uvx mcp-for-blender install-addon
uvx mcp-for-blender addon-paths   # optional: list detected Blender addons folders
2. In Blender: Preferences → Add-ons → disable and re-enable Interface: MCP for Blender (or restart Blender), then click Start MCP Server again.
3. Delete the MCP server from Claude and add it back again if the server package itself needs a refresh.
Note: the MCP server never modifies your Blender addon files on its own. When it starts, it checks whether the installed addon is behind the bundled copy and logs how to update;install-addonis what actually writes, and it keeps a.bakof the file it replaces. Trajectory capture still works on older loaded addons via anexecute_codefallback.
---
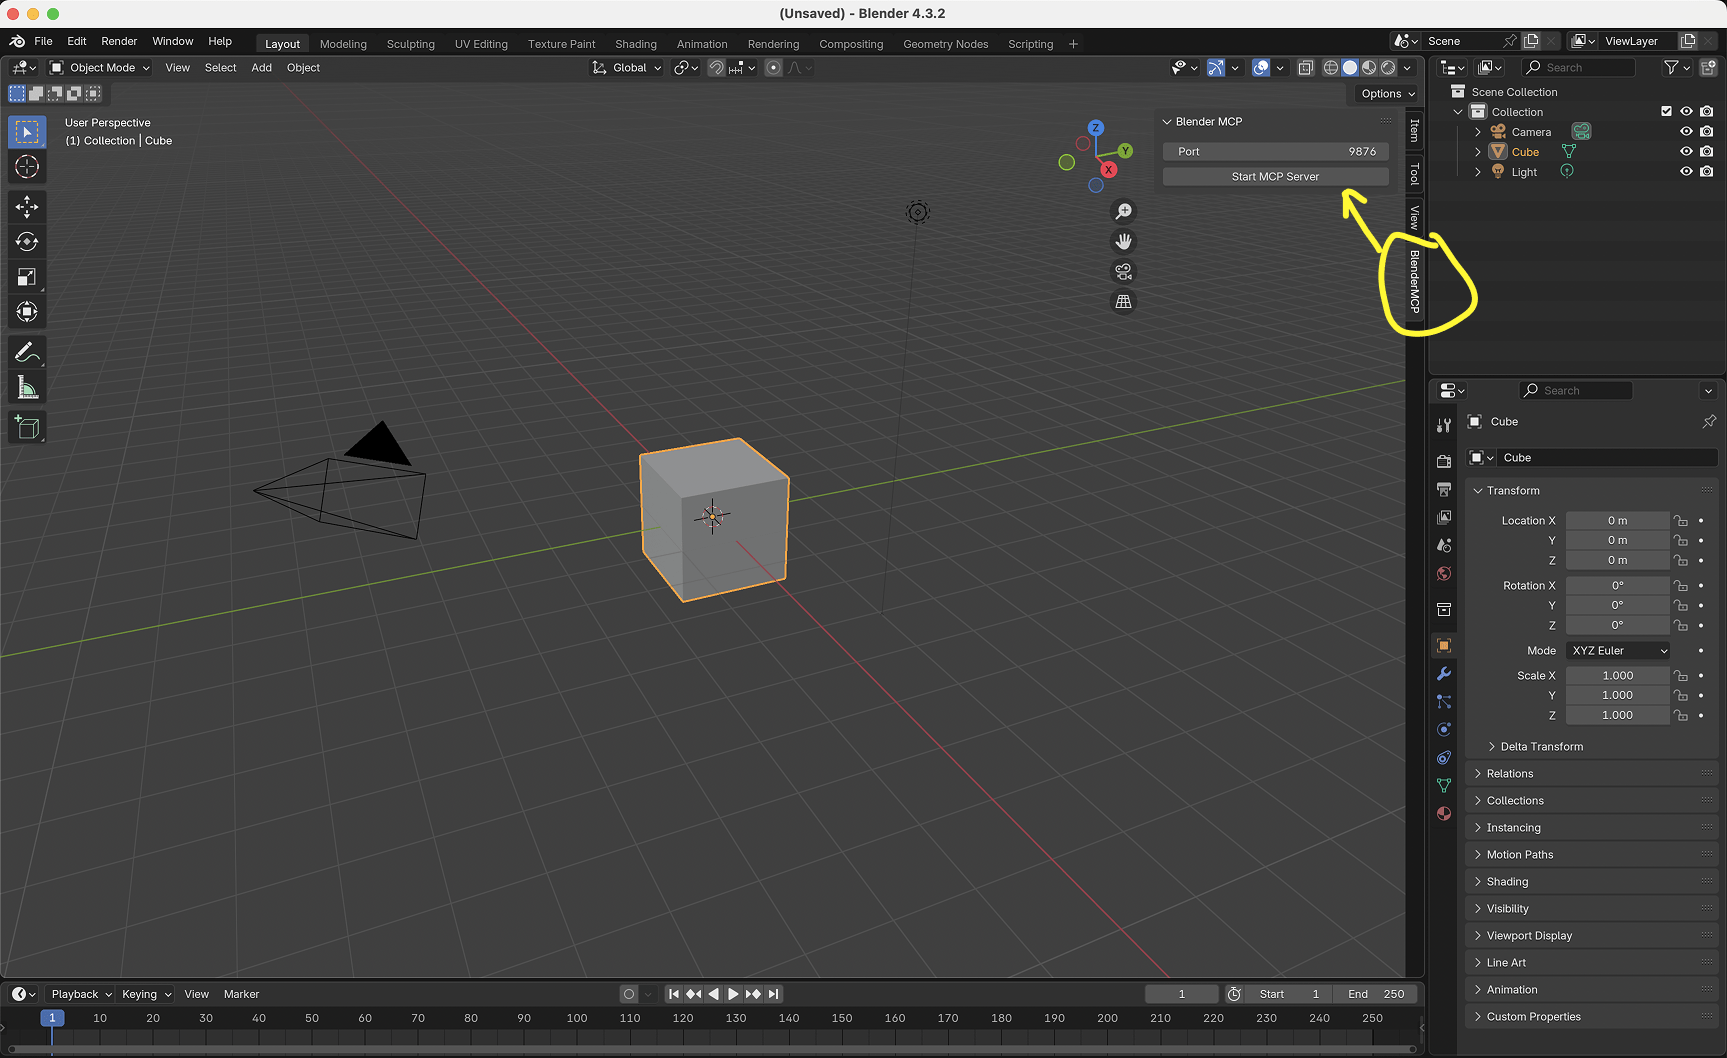
1. In Blender, go to the 3D View sidebar (press N if not visible) 2. Find the MCP for Blender tab 3. Turn on the checkboxes you'd like to use (see more under Capabilities below) 4. Click Connect to Claude 5. Make sure the MCP server is running in your terminal
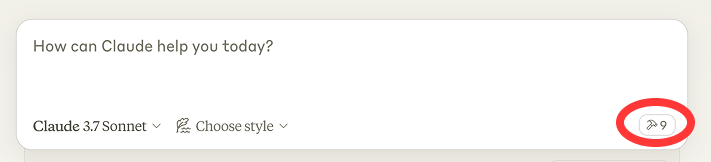
Once the config file has been set on Claude, and the addon is running on Blender, you will see a hammer icon with tools for MCP for Blender.
export_scene)Which Tencent Cloud service the addon must call depends on where your account lives:
| Account | Service the addon calls | Region | Sidebar toggle |
|---|---|---|---|
| Mainland (cloud.tencent.com) | AI3D 3.0 (ai3d, version 2025-05-13) | ap-guangzhou | leave International (Pro) account off (default) |
| International (tencentcloud.com), Hunyuan-to-3D (Professional) | hunyuan, version 2023-09-01, PBR enabled | ap-singapore | tick International (Pro) account |
International credentials sent to the mainland endpoint fail with AuthFailure.SignatureFailure or
ResourceUnavailable, so tick the toggle when your SecretId/SecretKey come from tencentcloud.com.
The toggle sits under Tencent Hunyuan 3D → Official API in the sidebar.
Poly Haven publishes around 2,400 HDRIs, textures and models, all CC0 and free, funded by donations rather than by selling the assets. There is no API key, no account
→ →
→ →
→ →
→ →
→ →
→ →
→ →
→